• Detailing
  • Motorcycle
  • Parts
  • Truck
  • Utility Trailers
  • Blog
Auto Motivex
keep your memories alive
Parts

Top 8 Mechanic Tool Sets for Automotive Excellence

by auto_motivex November 26, 2023
written by auto_motivex

Selecting and Acquiring a Mechanic Tool Set for Automotive Maintenance: A Comprehensive Guide

Acquiring an appropriate mechanic tool set is paramount for do-it-yourself (DIY) enthusiasts engaged in the maintenance and repair of their vehicles. To embark on this endeavor, it is crucial to establish a realistic budget, considering the nature of anticipated repairs and maintenance tasks. Determining whether metric, standard, or a combination of both tools is necessary is an essential preliminary step.

For those undertaking lighter tasks such as fluid changes and engine tune-ups, a budget of a few hundred dollars may suffice. However, engaging in more complex endeavors like brake pad and rotor replacements, cooling system overhauls, exhaust repairs, suspension system maintenance, and other significant upgrades will necessitate a higher financial commitment.

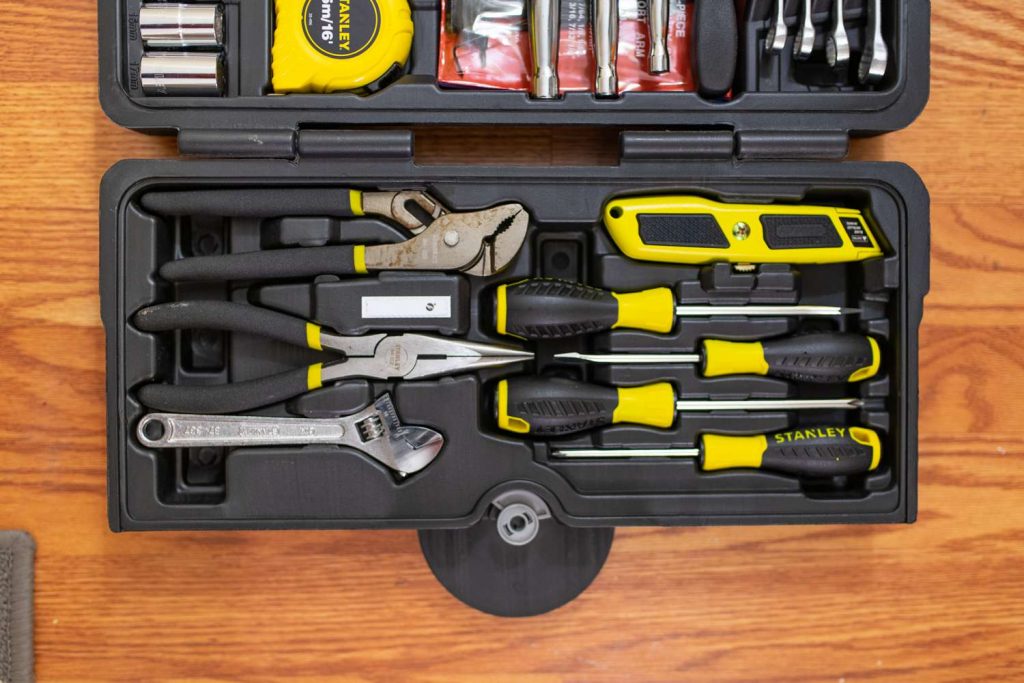
In addition to the specialized tools required for specific automotive tasks, there are foundational tools that every DIYer should possess in their home toolbox, which can also be effectively utilized for auto maintenance and repairs. Notable examples include:

  1. Screwdrivers: Opt for a set featuring soft, ergonomic handles to maximize turning power with minimal effort, making them a prudent and enduring investment.
  2. Pliers: A comprehensive set, inclusive of a diagonal wire cutter, slip-joint, needle-nose, and groove or arc-joint pliers, is indispensable for a versatile range of tasks.

By judiciously considering budget constraints and understanding the essential tools required, DIY enthusiasts can ensure they are well-equipped to navigate the spectrum of automotive maintenance and repair challenges.

Essential Tools for Automotive Repairs: A Comprehensive Overview

  • The pivotal role of well-equipped toolsets in automotive repairs cannot be overstated, with ratchets and sockets emerging as the cornerstone of any proficient toolbox. These tools, available individually or in sets, come in varying drive sizes, such as 1/4-in., 3/8-in., and 1/2-in. The efficacy of ratchets is heightened in confined spaces, especially those boasting 72 teeth or more, while “quick-release” models facilitate the seamless removal of sockets, even with greasy hands.
  • Sockets, crucial for a myriad of tasks, are offered in standard (SAE) and metric sizes, each available in different lengths. Specialized sockets designed for spark plug removal and installation are also available, featuring stamped or laser-etched markings for easy identification. Six-point sockets are recommended for automotive applications, as their thicker walls apply force to the flat shoulder of the hex bolt/nut, reducing the risk of rounding off rusted or overtightened fasteners. Sets that encompass Torx and hex sockets contribute to comprehensive versatility.
  • Socket extensions and flex (universal) sockets play a vital role in navigating obstacles and accessing nuts and bolts in confined spaces. Extensions with knurled shafts offer a better grip for manual initiation of fasteners.
  • Box wrenches, available in standard or metric sizes, and combination wrenches expedite repairs, with offset, angled, or ratcheting variations facilitating access to challenging areas.
  • Nut drivers or all-in-one nut drivers accommodating different size hex and Torx bits prove invaluable, particularly in trim work or around the dashboard.
  • When investing in a mechanic tool set, manufacturers often emphasize the number of pieces included. It is crucial to scrutinize the itemized parts list, usually available on the manufacturer’s website, to gain a precise understanding of the set’s contents. Notably, not all mechanic sets encompass the entirety of these tools, necessitating separate purchases to complete the toolkit.
  • To ensure longevity, prioritize hand tools with a limited lifetime warranty and adherence to American Society of Mechanical Engineers (ASME) or American National Standards Institute (ANSI) standards. While quality hand tools can endure indefinitely, it is prudent to select those backed by a warranty for added assurance.

Optimal Mechanic Tool Sets for Beginners and Enthusiasts: A Comparative Analysis

Selecting the ideal mechanic tool set is a crucial decision for both beginners and DIY enthusiasts seeking to elevate their automotive repair capabilities. This analysis delves into two notable options for different skill levels, considering their composition, utility, and overall value.

Best Mechanic Tool Set for Beginners

The Kobalt 81240 (129-Piece) Standard and Metric Combination Mechanic Tool Set emerges as an excellent choice for novices, encapsulating a comprehensive assortment of tools within a compact and convenient carry case. While lacking a 1/2-in. drive ratchet, the 1/4-in. and 3/8-in. drive 90-tooth ratchets prove invaluable for maneuvering in confined spaces. Noteworthy features include open-end wrenches, a hand hex-nut driver, and bits, making this set a worthwhile investment for those embarking on basic vehicle maintenance or repairs. An honorable mention goes to the DekoPro ‎8542037480 192-Piece Mechanics Tool Set, which, despite the absence of a 1/4-in. drive ratchet, includes pliers and screwdrivers, presenting another commendable option for beginners. The inclusion of a blow-molded case and essential tools positions this set as a valuable resource for minor automotive and DIY home repairs.

Best Mechanic Tool Set Upgrade

For DIYers seeking an upgrade in their automotive repair tools, the Husky Model H349MTS (349-Piece) Mechanics Tool Set stands out as an excellent choice. Featuring 72-tooth polished ratchets optimized for tight quarters, this set boasts a diverse array of six- and 12-point sockets, bits, and accessories, quickly establishing itself as the go-to toolkit for serious automotive repairs. Backed by a “no questions asked” lifetime warranty and delivering quality comparable to top professional brands, the Husky tool set becomes a prized addition to any mechanic’s toolbox. An honorable mention goes to the Gearwrench ‎80972 (243 Piece) Mechanics Three Drawer Tool Set, renowned for its 84-tooth ratchets with flush-fitted directional levers, ideal for intricate spaces. This set offers an extensive assortment of heavy-duty 12-point sockets, extensions, adapters, wrenches, and accessories, meeting ASME standards and accompanied by a limited lifetime warranty and a three-drawer blow-molded toolbox, thus justifying its price.

Best Compact Mechanic Tool Set

The Crescent CTK180-07 (180-Piece) Professional Tool Set stands out as a budget-friendly option that excels in compactness without compromising functionality. While lacking a 1/2-in. drive ratchet, this set adheres to both ANSI and ASME specifications, encompassing a diverse array of tools suitable for most minor vehicle repairs and upgrades. Weighing a mere 20 pounds and housed in a sleek case, it proves to be an excellent choice for portability, making it ideal for storage in a trunk or RV during road trips. An honorable mention goes to Channellock’s ‎39053 (171-Piece) Mechanics Tool Set, distinguished by magnetic bits and a parts tray, packaged in a well-organized, compact, and durable case. Complying with ANSI standards, this set, when paired with Channellock pliers, transforms into an indispensable DIY mechanic tool set.

Best Portable Mechanic Tool Set

Catering to the needs of the on-the-go at-home mechanic, the DeWalt DWMT73803 (168-Piece) Mechanics Tool Set emerges as an unparalleled choice, boasting a stellar 4.8-star rating on Amazon from over 11,000 reviews. This set includes three 72-tooth ratchets, finely crafted six-point deep and shallow sockets with clearly stamped standard or metric sizes, and socket extensions featuring knurled non-slip shafts for enhanced fingertip control during fastener removal or installation. All tools, including a driver set housed in a versatile removable storage box, along with 12 combination wrenches, are neatly packed into a sturdy carrying case. An honorable mention goes to the Husky Model H194MTS (194-Piece) Mechanics Tool Set, distinguished by its well-organized case that securely holds the tools in place. This design facilitates ease of use away from home, with engraved sockets for quick identification and angled wrenches enabling access to bolts that may be challenging to reach with sockets.

Best Value Mechanic Tool Set

The Craftsman Model 9-99030 (320-Piece) Mechanic’s Tool Set, despite lacking pliers and screwdrivers, emerges as an outstanding choice for an experienced DIYer. Tailored for engine, brake, suspension, and other intricate vehicle repairs, this set incorporates metric and standard combination wrenches, along with a comprehensive array of ratchets, sockets, bits, and drivers suitable for tasks deep within the engine bay. Reasonably priced and fortified by Craftsman’s full lifetime warranty, this set is deemed indispensable for any dedicated at-home mechanic. An honorable mention goes to the WorkPro ‎W003056A (450-Piece) Mechanics Tool Set, featuring three 45-tooth ratchets, an extensive assortment of easily identifiable six- and 12-point sockets, combination wrenches, and hex and Torx bit/sockets—all housed in a three-drawer blow-molded case.

Best Multi-Purpose Mechanic Tools Set

Tailored for both novice and experienced DIYers, the highly-regarded Stanley STMT73795 (210-Piece) Mixed Mechanics Tools Set proves unbeatable. This comprehensive set includes essential tools capable of handling minor vehicle, motorcycle, and small engine mechanical issues, along with basic house repairs and maintenance. Specifically designed for DIY enthusiasts, this set is poised to impress even seasoned mechanic peers. An honorable mention is the WorkPro W009037A (322-Piece) Home Repair Hand Tool Set, encompassing a generous assortment of tools for mechanics (sockets/ratchets/wrenches) and home repair DIYers (claw hammer/level/tape measure). The inclusion of rubberized handles enhances grip, reducing the risk of injury. Encased in a durable nylon bag, this versatile set is ideal for storage in your home, trunk, or office.

Honorable Mention for All-Around Excellence

The DeWalt DWMT75049 and DWMT74733 (192-Piece) Mechanics Tool Sets earn an honorable mention for their exceptional quality. Characterized by six-point laser-etched sockets for easy identification, these top-tier tool sets encompass a wealth of 3/8-in. and 1/2-in. drive accessories, eight combination box wrenches, and are backed by a limited lifetime warranty.

Best Impact Socket Set

For enthusiasts engaged in tasks involving axles, wheel hubs, suspension systems, farm equipment, or vintage vehicles, as well as those who favor cordless or pneumatic impact drivers or impact guns, the Neiko 02448A 65-piece Impact Socket Set is an indulgent choice. This set stands out due to the distinct heat-treating process employed during the manufacturing of chrome sockets. While traditional chrome sockets are extremely hard—suited for hand tools but hazardous for impact drivers—impact sockets undergo specialized treatment, rendering them softer, thicker, heavier, and heat-treated differently. The set includes six-point deep and shallow, metric and standard 3/8-in. and 1/2-in. drive sockets, accompanied by accessories essential for working on rusted nuts and bolts.

November 26, 2023 0 comment
0 FacebookTwitterPinterestEmail
Truck

Enhancing Your Pickup Truck with a Professional Bedliner Paint Application

by auto_motivex November 25, 2023
written by auto_motivex

A Comprehensive Examination of Roll-On Bedliner Application for Pickup Trucks

Abstract: This paper provides an in-depth overview of roll-on bedliner applications for pickup trucks, offering insights into various options available for protecting and enhancing the truck bed. Whether preserving a pristine factory-made bed or concealing imperfections in a worn bed, truck owners can choose from molded drop-in liners, professionally applied spray-on liners, or opt for a do-it-yourself (DIY) approach with roll-on bedliners. Each option comes with its unique advantages and disadvantages, necessitating careful consideration based on individual preferences and requirements.

The selection of an appropriate bedliner is a crucial decision for truck owners aiming to safeguard their vehicle beds. This paper focuses on the DIY roll-on bedliner option, which is a cost-effective alternative priced between $100 and $200, inclusive of essential materials such as tape and cleaners. While molded drop-in liners and professionally installed spray-on liners present viable alternatives, the DIY roll-on bedliner proves to be a customizable and budget-friendly solution.

Molded drop-in bedliners offer shock absorption and protection against abrasive materials like gravel or sand but may be prone to slipperiness and punctures. On the other hand, spray-on and roll/brush-on bedliners, composed of a robust polyurethane mixture, provide a durable coating. However, they are not removable and are susceptible to denting due to their comparatively thinner composition. Careful consideration of the specific requirements and priorities is essential when choosing the appropriate bedliner type.

Regardless of the chosen bedliner type, meticulous preparation is emphasized as the cornerstone for achieving a solid and enduring coating. Any shortcuts in the preparation process may result in a compromised surface susceptible to chipping or peeling.

Prominent retail brands such as Herculiner, Dupli-Color, and Rust-Oleum dominate the market, and their products can be found at most auto parts stores. Additionally, numerous other brands are available online, offering a wide array of options for prospective buyers. The products typically come in three formulations: water-based, solvent-based single-stage, and solvent-based two-part formulas, each varying in cost and performance attributes.

To ensure a uniform and resilient bedliner coating, the paper recommends investing in the manufacturer’s optional application kit and employing the provided special roller. However, for those choosing to brush on the product, back-rolling is advised for achieving a consistent texture. Furthermore, the choice between water-based or single-stage products, and two-part formulas, is guided by factors such as cost and desired durability.

Preparation Steps for Roll-On Bedliner Application

Abstract: This section outlines the meticulous preparation steps necessary for the successful application of a roll-on bedliner. Divided into four key steps, the process covers bed and tailgate cleaning, masking, scuffing, and wiping with specific attention to detail, ensuring an optimal surface for the subsequent bedliner application.

1.Wash:

  • Remove the tailgate and place it on sawhorses for accessibility.
  • Clear the bed and tailgate of dirt and debris using a sweeping or vacuuming method.
  • Ensure drain holes are unobstructed.
  • Scrub both surfaces with a potent TSP (trisodium phosphate or substitute) and water solution to eliminate oil, petroleum, or wax-based residues.
  • Utilize chemical removers and a scraper as needed, following the kit’s instructions.
  • Rinse thoroughly with clear water and wipe with a clean rag.
  • Allow ample time for complete drying.

2.Mask

  • Employ painter’s tape to meticulously mask off areas not intended for coverage, especially near the tailgate.
  • Press the tape firmly to create an effective protective seal.
  • Seal drain holes with tape or foam rubber weatherstripping.

3.Scuff:

  • Thoroughly scuff all painted surfaces, addressing any surface rust, and ensuring a uniform, bond-friendly texture.
  • Take care to eliminate glossy areas and address deep rust or corrosion with 150-grit sandpaper.
  • Remove sanding dust by blowing or wiping down the bed.
  • Apply a rust converter/primer/sealer to bare metal areas, allowing it to dry.
  • Avoid using lacquer-based primer.

4.Wipe:

  • Wipe the bed area with acetone, using a spray bottle and chemical-resistant gloves.
  • Start from the front of the bed, allowing the acetone to sit briefly before wiping with clean shop towels.
  • Do not use the same side of the towel twice.
  • Wipe the entire bed surface where the material will be applied.
  • Allow approximately 10 minutes for drying.
  • Avoid lacquer or alcohol-based solvents during this process.

These detailed steps, when diligently followed, establish a foundation for the subsequent application of the roll-on bedliner, ensuring optimal adhesion and longevity of the protective coating.

Roll-On Bedliner Paint Application Process

Abstract: This section delineates the meticulous steps involved in the application of a roll-on bedliner, encompassing the preparation and execution of the painting process. From the initial mixing of the bedliner material to the final touches, the following steps provide a comprehensive guide for achieving a professional-grade coating.

5.Brushing:

  • Remove the bedliner paint lid and meticulously mix the material using a paint mixer coupled with a power drill, ensuring the temperature falls within the range of 32 to 95 degrees Fahrenheit.
  • If the material proves excessively thick for brushing or rolling, consider thinning it by up to 10 percent with xylene.
  • Stir the mixture periodically during application.
  • Commence the application process by focusing on seams and corners, employing a dabbing motion rather than a stroking one to ensure thorough coverage.

6.Rolling:

  • After covering seams and corners, utilize the provided textured roller cover and handle to gently apply the material to the front and side panels.
  • Progress to rolling the material onto the tailgate and the floor of the truck bed.
  • Apply a second coat of material along taped edges before the initial coat dries to prevent tape tearing upon removal.
  • Address any missed areas with a small brush.
  • Upon completion, dispose of the roller cover and wrap the brush in a plastic bag to prevent drying.
  • Use xylene to remove excess material while still in its wet state.
  • Apply the second coat once the first has set up, typically within six hours or when no longer tacky to the touch.

Required Tools for this Truck Bed Coating Project:

  • 4-in-1 screwdriver
  • Adjustable wrench
  • Bucket
  • Cordless drill
  • Paint roller
  • Paint scraper
  • Safety glasses
  • Stiff brush

Additionally, an organic vapor respirator is essential for ensuring safety during the application process.

These detailed steps, coupled with the requisite tools, facilitate a systematic and effective roll-on bedliner paint application, culminating in a durable and professional finish for the truck bed.

Essential Materials for the DIY Bedliner Paint Project

Abstract: This section outlines the indispensable materials required for the successful execution of a do-it-yourself (DIY) bedliner paint project. Ensuring a seamless and efficient process, a comprehensive list of materials is provided, aiming to eliminate the need for last-minute shopping and facilitating a well-prepared approach.

  • 1 qt. Xylene
  • 150-grit Sandpaper
  • Acetone
  • Bed Liner Kit
  • Box of TSP (Trisodium Phosphate)
  • Household Sprayer
  • Paint Mixer for Power Drill
  • Roll of 2-in. Blue Masking Tape
  • Roll of Lint-Free Blue Paper Shop Towels
  • Rubber-Coated (PVC) Gloves
  • Two Additional Scotch-Brite Pads
  • Two Disposable Paint Roller Pans

By acquiring these materials in advance, DIY enthusiasts can streamline the bedliner paint project, ensuring a well-prepared and organized approach. This comprehensive list covers every essential item required for a successful and professional-grade application of the bedliner coating.

November 25, 2023 0 comment
0 FacebookTwitterPinterestEmail
Detailing

Top 7 Tools for Cleaning Car Windows

by auto_motivex November 24, 2023
written by auto_motivex

To maintain the aesthetic appeal of your vehicle, paying attention to its windows is crucial. Clear and well-maintained windows play a significant role in ensuring safe driving. However, achieving spotless cleanliness on glass surfaces can be a challenging task. This paper provides insights into the considerations one should bear in mind when selecting tools for cleaning car windows effectively.

Key Points:

  1. Use Specialized Products:
    Cleaning car windows requires the use of products specifically designed for the task. Automotive glass cleaners differ from household alternatives due to the higher accumulation of grease and grit on auto glass. While household cleaners may leave streaks, quality automotive glass cleaners effectively remove grime.
  2. Clean Both Sides:
    Auto glass cleaning should address both the exterior and interior surfaces. The inside of car windows is prone to accumulating dirt, necessitating thorough cleaning for optimal visibility.
  3. Comprehensive Cleaning Process:
    While using car soap, water, and a sponge is an initial step in proper window cleaning, it is not exhaustive. Employing a dedicated glass cleaner and preventing water from leaving marks during the drying process are equally critical.
  4. Effective Drying:
    Neglecting the drying step can lead to noticeable marks on the glass. Using the right towel at the appropriate time during the drying process is essential to prevent these marks.

Researcher’s Recommendations:
After extensive research and testing, a compilation of the best car window cleaner tools available in the market is presented. The following section highlights one such tool:

Best Car Soap:
The car soap from Chemical Guys stands out as the top exterior vehicle cleaning product based on thorough testing. Its concentrated formula ensures efficient removal of mud, dirt, bugs, and bird droppings with minimal effort. The soap generates a thick, grease and dirt-cutting foam, contributing to its superior cleaning performance compared to other brands.


Efficient car window cleaning requires the careful selection of tools that enhance effectiveness and ease of use. This section provides insights into the best tools for this purpose, including alternatives to traditional sponges, effective glass cleaners, and reliable microfiber cloths.

Best Car Cleaning Mitts:
Traditional sponges often prove cumbersome and less effective, particularly when addressing hard-to-reach areas on car windows. In contrast, microfiber car wash mitts have proven to be a superior alternative. Introduced to my cleaning routine in 2021, these mitts not only outperform traditional sponges but also offer improved handling due to their hand-fitting design. The ability to exert greater pressure results in a more thorough and efficient wash.

Best Glass Cleaner – Invisible Glass:
While washing car windows is a standard practice, achieving a streak-free finish can be challenging, especially in areas with hard water. To address this issue, the adoption of Invisible Glass cleaner has proven highly effective. This cleaner, when applied to car windows and wiped with a microfiber cloth, eradicates mineral streaks caused by water impurities. Its unparalleled performance in resolving this common issue sets it apart as the optimal choice.

Best Microfiber Cloths:
The final touch in the window cleaning process involves the use of microfiber cloths. The preference leans towards a specific set that includes both green cleaning cloths and blue, fine-weave cloths designed for streak removal. While the green cloths are not frequently utilized, the blue ones excel in their role as a glass cleaner. Notably, these cloths stand out for their lint-free nature, ensuring a pristine finish without the inconvenience of fiber residue common in other products.

This comprehensive evaluation aims to guide car enthusiasts and meticulous cleaners towards the most effective tools for achieving impeccable car window cleanliness.

Achieving pristine car windows involves not only selecting the right cleaning tools but also considering factors such as reach, interior cleanliness, and long-term protection against environmental elements. This segment delves into three critical tools— a reaching tool for enhanced accessibility, an interior glass cleaner for comprehensive cleanliness, and a water repellent for sustained clarity.

Best Reaching Tool:
While personal attributes may mitigate the need for a reaching tool for some, its significance becomes evident when addressing hard-to-reach areas, especially for those with shorter reaches. This reaching tool, characterized by its strength, lightweight design, and extendable features, proved indispensable for reaching the central part of the windshield. Boasting an additional 24 inches of reach, it includes a microfiber cloth custom-fitted over the cleaning pad, providing an effective solution for optimal window cleaning.

Best Interior Glass Cleaner:
The presence of a young child and a pet necessitates a more thorough approach to car window cleaning, extending beyond the exterior surfaces. This interior glass cleaner stands out for its versatility, not only effectively cleaning the insides of car windows but also addressing dirt, sticky fingerprints, nose prints, and other residues on the central console and seats. Its multifunctionality distinguishes it from conventional glass cleaners.

Best Water Repellent – Rain-X:
Even with meticulous cleaning, the persistence of streaks and watermarks on car windows remains a common concern. Introducing Rain-X, a water repellent that, when applied properly, prevents water droplets from settling long enough to leave marks upon drying. This product’s unparalleled effectiveness in providing sustained clarity sets it apart as an essential component of a comprehensive car window maintenance routine. Regular application, accompanied by a microfiber cloth, ensures prolonged protection against environmental elements.

This detailed examination aims to guide car enthusiasts in selecting tools that not only address immediate cleaning needs but also contribute to the long-term maintenance and clarity of car windows.

November 24, 2023 0 comment
0 FacebookTwitterPinterestEmail
Parts

Unlocking Versatility: 8 Essential Weed Wacker Parts and Attachments

by auto_motivex November 20, 2023
written by auto_motivex

Exploring the Versatility of Weed Wacker Parts and Attachments

String trimmers, colloquially known as “weed wackers,” are commonly employed tools for cutting weeds and trimming lawn edges. However, the integration of various attachments can transform these string trimmers into versatile tools suitable for a wide range of gardening, landscaping, and tree care tasks.

Greenworks Horizontal Blower Attachment

One notable attachment is the Greenworks Horizontal Blower Attachment, which converts any Greenworks attachment-capable string trimmer into a potent blower designed for efficient leaf and debris clearance in yards. Despite being a secondary attachment, the blower exhibits substantial power, generating airflow reaching up to 145 mph.

Trimmer Plus Garden Cultivator Attachment

Another valuable addition is the Trimmer Plus Garden Cultivator Attachment, featuring four heat-treated steel tines with exceptional sharpness and durability. These tines effectively break through dirt and rocks during garden tilling, and users can customize the tine spacing to achieve the desired width, enhancing the tool’s flexibility. Designed to be compatible with attachment-capable trimmers from major brands such as Troy-Bilt, Ryobi, and Craftsman, the cultivator expands the range of applicable trimmers.

Worx Lawn Edger Attachment

Achieve precise lawn edging with Worx’s Edger Attachment. This attachment, known for its universal compatibility, features robust steel cutting blades that deliver a sharp and well-groomed finish to the outer edges of your lawn.

Shoulder Strap Harness

Enhance your trimming experience and alleviate strain on your back with the Shoulder Strap Harness. This straightforward and adjustable accessory employs a single-shoulder design to evenly distribute the weight of the string trimmer, minimizing wear and fatigue on your shoulders and back.

Black+Decker Lawn Mower Attachment

While not recommended for extensive acreage, this string trimmer attachment from Black+Decker offers a space-efficient solution for small yards, eliminating the need for a bulky, full-sized lawnmower. Compatible with any suitable Black+Decker string trimmer, this attachment transforms your trimmer into a reliable and efficient lawn mower, ensuring quick and precise grass cutting.

Worx Pole Saw Attachment

While traditional weed whackers may not be the go-to choice for tree trimming, the universal Worx Pole Saw attachment changes the game. When affixed to the end of a string trimmer, it enables the pruning of leaves and branches up to 12-1/2 feet high. This capability facilitates both aesthetic tree shaping and the maintenance of tree health.

Worx Hedge Trimmer Attachment

The Worx Hedge Trimmer Attachment stands out with its dual-action blades boasting a substantial 10-inch diameter, a dimension claimed by Worx to surpass any other brush cutter attachment on the market. The wider blade coverage translates to fewer passes required to trim a bush. Additionally, weighing in at just 4.42 pounds, the attachment offers enhanced maneuverability and operational ease, particularly during extended use.

November 20, 2023 0 comment
0 FacebookTwitterPinterestEmail
Detailing

Polishing Your Ride: Seven Ingenious Home Applications for Car Wax

by auto_motivex November 19, 2023
written by auto_motivex

1.Enhance Clarity in Mirrors

Prevent post-shower fog on your bathroom mirror by utilizing car wax. Apply a small quantity of car wax to the mirror, let it dry, and then buff with a soft, dry cloth.

2.Achieve Smudge-Free Kitchen Appliances

For stainless steel kitchen appliances, consider using car wax for cleaning instead of a conventional surface cleaner. Apply a light coat of car wax to the appliance, allow it to dry, and buff it clean to resist fingerprints and smudges. Say goodbye to those unwanted kiddie fingerprints on the fridge!

3.Optimize Snow Shoveling Efficiency

Make snow shoveling less frustrating by preventing heavy snow from sticking or freezing on the shovel. Prior to clearing your driveway and walking paths, apply car wax to your shovel, following the instructions on the car wax package. Typically, a thin layer of car wax is applied with a damp cloth, allowed to dry, and then buffed off with a dry cloth. This ensures a clean and lubricated shovel, preventing snow and ice from adhering.

4.A Scrub and Polishing Treatment

In his editorial contribution, Field Editor Joe Stiles outlines his maintenance routine: “Every three months, I employ CLR Calcium, Lime, and Rust Remover along with an old toothbrush to meticulously clean all faucets and lavatories. Subsequently, I apply an automotive car wax, such as Turtle Wax, and buff it once the wax has hazed. This regimen leaves our fixtures looking as if they were brand new.

5.Lubricating Glue Caps and Lids

Certain adhesive and glue caps, such as those found on rubber cement and super glue, tend to become stuck or adhere tightly, regardless of efforts to maintain cleanliness. This issue can be preemptively addressed by applying a thin layer of petroleum jelly or car wax onto the threads of the tube or lid. A small amount of petroleum jelly or wax is all that is required to avert potential mess. It is essential to apply a thin layer before resealing the glue cap to prevent it from bonding over time. By adopting this practice, users can effortlessly open their super glue when needed, facilitating prompt and hassle-free use.

Alternatively, a similar effect can be achieved by spraying a small amount of WD-40 inside the cap.

6.Table Saw Maintenance: Applying a Protective Wax Coating

To maintain the optimal performance of your table saw, utilize a scotch bright pad and a razor blade to meticulously polish and remove any accumulated deposits of glue, rust, or other residues. Subsequently, generously apply a coating of wax to all surfaces, including the table, miter gauge slots, fence, and the fence guide strip. Achieve a polished finish by using a cotton cloth.

7.Enhancing Snowthrower Efficiency with a Smooth Chute

When the snow season returns, a comprehensive snowthrower tune-up is essential, encompassing the application of Rain-X or car wax to the interior of the chute. This water-repelling spray or wax serves to prevent clogging caused by wet, compacted snow and ice. The Rain-X or Turtle Wax imparts a smooth surface to the chute, facilitating the effortless release of snow. It is recommended to reapply Rain-X or car wax inside the chute every few snowfalls for optimal results. — John Gossard.

November 19, 2023 0 comment
0 FacebookTwitterPinterestEmail
Utility Trailers

Reviving the Camper: Transforming a Dilapidated Trailer into a Stunning Showcase

by auto_motivex November 18, 2023
written by auto_motivex

In decades past, the July/August edition of Family Handyman predominantly featured projects centered around yard sheds. However, this year marked a departure from that tradition as we embraced a new challenge, inspired by a mere daydream.

Have you ever looked upon a neglected, aged item and envisioned its potential transformation? This sentiment encapsulates our initial encounter with the camper. Disregarding the dents, rust, flat tires, and dulled aluminum, we set our sights on a vision of a meticulously restored trailer gracefully traversing the roads—a resplendent mobile exhibit destined to captivate onlookers. Moreover, we envisaged the liberating concept of a home on wheels, providing the freedom to roam anywhere, anytime—an ode to independent travel. Speaking of independence, presented herein are 10 vintage camping hacks essential for every avid camper.

Nevertheless, such freedom comes at a considerable cost. A new camper of comparable size commands a minimum price of $20,000, often exceeding twice that amount. In contrast, we acquired this vintage gem for under $7,000 and invested a comparable sum in its restoration—an economically sound decision.

Yet, the true triumph extends beyond mere financial considerations. We achieved a harmonious blend of the past and the present—a thoroughly rejuvenated camper exuding a distinctive vintage flair. Alongside its aesthetic appeal, the restored camper now embodies a tangible piece of history, commanding attention on the open road and within campsites alike.

A Shift in Strategy

Initially, our primary objective was to restore the aluminum exterior to its original luster. Consulting with experts, we amassed an array of polishing equipment and commenced our experimentation. While we achieved a mirror-like shine, progress proved unacceptably slow, posing a challenge to our timeline.

In pursuit of an alternative, we sought a paint solution capable of forming a resilient, glossy surface. The optimal answer surfaced in the form of alkyd paint. While water-based acrylic paints are generally favored for most do-it-yourself (DIY) projects, traditional oil-based alkyds demonstrated superior leveling properties and the ability to form a more robust film.

Considering the potential mess associated with spraying paint in our workspace, we opted for a rolling technique. The results surpassed our expectations and offered a distinct advantage over spraying— the subtle texture imparted by the roller effectively concealed minor dents and scratches.

Contemplating methods to eliminate old paint and rust led us to consider sandblasting initially. However, this process necessitates a sizable air compressor and results in substantial airborne dust. Consequently, we explored the option of “vapor blasting.”

Similar to sandblasting, vapor blasting subjects a surface to abrasive media, but it relies on water from a pressure washer instead of air, mitigating the mess and utilizing a commonly available tool. Our experimentation with a generic pressure washer vapor blasting kit ($30 online) yielded valuable insights:

  1. Match the gun to your pressure washer, considering varying sizes and specific psi ratings. The pressure washer’s psi rating must align with the kit’s recommended range. Our initial purchase, priced at $120, proved too large and incompatible with our 2,700 psi pressure washer.
  2. A higher psi rating for the pressure washer yields more effective results. While our 2,700 psi machine was functional, it exhibited slower progress. Opting for a system within the 5,000 to 7,000 psi range would significantly expedite the process.
  3. The type, weight, and size of the blast media significantly impact outcomes. We experimented with three varieties before discovering that coarse coal slag from Tractor Supply Co. ($8.99 for 50 lbs.) effectively met our requirements.

Mitigating ‘Flash Rust’

The preparation of steel surfaces for painting entails considerable effort, and it is crucial to be aware of a potential issue: Moisture in the air can swiftly induce “flash rust” on exposed steel, even if not immediately visible. This latent rusting can become problematic after the application of paint. To preemptively address this concern, we promptly wiped down all surfaces with denatured alcohol and subsequently applied a black rust conversion primer.

Preparing Aluminum for Paint

The condition of the camper’s aluminum surface was notably grim. To ensure the longevity of our paint job, a thorough cleaning was imperative. Despite experimenting with soap and water, TSP, and muriatic acid, none proved effective against the decades of exposure the camper had endured.

JJV’s Best Aluminum Cleaner ($42 online), designed for cleaning aluminum watercraft, emerged as a highly effective solution for preparing the aged, anodized aluminum for painting. This process was facilitated by employing two individuals. Using a spray bottle, we applied the cleaner at full strength, allowing it to sit for 10 minutes. Subsequently, employing an industrial scrub brush, we systematically worked the cleaner across the surface, adjusting the application where necessary. Finally, utilizing the fine spray setting on the nozzle, we rinsed the surface with water.

Incorporating a Catalyst

Opting for oil-based alkyd paint, chosen for its superior leveling properties and the ability to form a more durable finish than most water-based alternatives, we selected Krylon Farm and Implement paint ($40 per gallon at O’Reilly Auto Parts). To enhance the paint’s durability further and expedite the curing process, we introduced Krylon’s catalyst hardener into the formulation.

Brush, Then Roll

To ensure a uniform texture, we applied paint with an extra-stiff brush featuring natural bristles to areas that might be missed by the roller, promptly followed by a pass with the roller. Given the thickness of the paint, the choice of an extra-stiff brush proved essential.

Quality Rollers are the Key

Investing in high-quality roller sleeves is paramount. While they may incur additional costs, the smoother results they yield make the expenditure worthwhile.

Painless Riveting

Upon the completion of the paint curing process and the subsequent reinstallation of nameplates and decorative elements, we employed POP rivets, also known as blind rivets. POP rivets consist of two components—the “hat” and the “mandrel.” Inserted into predrilled holes, these rivets are set using a rivet gun. The gun pulls the mandrel through the hat, causing the end of the mandrel to mushroom, after which it is sheared off, leaving only the rivet head visible.

The length of the rivet holds significance, requiring it to be twice its width plus the thickness of the material. For instance, when utilizing 1/8-inch rivets to join 1/4-inch material, the rivet should measure 1/2 inch in length. While handheld rivet guns are commonplace, we found the Milwaukee M12 battery-powered rivet gun to be exceptionally convenient, accommodating various rivet sizes and allowing for single-handed use. Although the bare tool comes at a cost of $230, it significantly eases the manual strain associated with riveting.

Endless Exterior Details

Numerous enhancements were made to the exterior, including the upgrade of all lights to energy-efficient LEDs, restoration of nameplates, and the installation of a toolbox in the trailer’s tongue. Notably, the whitewall tires, despite costing four times as much as blackwall trailer tires, stand out as a favorite detail, justifying their expense with a timeless aesthetic.

Clever Cooler Slide-out

With the removal of the camper’s old refrigerator, rendering its access and venting door redundant, we repurposed the space by constructing a lidded box/table just inside the door to accommodate a cooler. Mounted on heavy-duty 32-inch drawer slides, the cooler platform allows for easy access without the need to lift a cooler full of ice or step inside to retrieve a fresh beverage—simply open the door and pull the cooler outside.

Custom Decal

Despite our strong inclination towards DIY endeavors, we opted to subcontract the creation of our camper’s name badge. The production of both front and rear decals incurred a cost of approximately $200.

Nonslip Stair Tread

An effective method for introducing a nonslip surface to various surfaces, this straightforward technique, initially acquired during the fabrication of skateboards utilizing epoxy and clear grit, proved instrumental for enhancing the safety of our camper’s steps. In this instance, we applied POR-15 OEM Bed Liner coating to the stair tread, followed by a sprinkling of residual coal slag from the vapor blasting process. This approach involved the rolling of the bed liner onto the tread, subsequently applying the coal slag on top. Additionally, explore these 15 remarkable camping gadgets available on Amazon.

November 18, 2023 0 comment
0 FacebookTwitterPinterestEmail
Parts

Polished Protection: Armor All Wash & Wax

by auto_motivex November 17, 2023
written by auto_motivex

Over two decades have passed since my high school graduation, marking the same span since I last engaged in the manual washing and waxing of a car. During those years, particularly in the waning weeks before the onset of summer break, a multitude of us would return home from school on Fridays, unfurl the hose and a five-gallon pail, gather our assortment of soaps, sponges, waxes, and towels, set the ambiance with some tunes, and commence the ritual of scrubbing our cars in the heart of the driveway.

This ritual, undoubtedly, served as a prelude to the subsequent nocturnal car cruises, yet the reminiscence of those moments is etched in my memory with great affection. Recently, my visit to the local auto parts store, aimed at procuring a wiper blade for my wife’s Subaru, unexpectedly led me to a corridor brimming with car washes, waxes, tire shines, and shammies, evoking a powerful wave of nostalgia. After traversing the aisle contemplatively, I ultimately settled on a container of Armor All Ultra-Shine Wash & Wax to bring home and revisit those cherished memories.

Title: Armor All Ultra Shine Wash & Wax: A Comprehensive Review

Introduction:
Armor All Ultra Shine Wash & Wax is a concentrated, dual-purpose car care solution, seamlessly combining a high-performance car wash soap with the protective qualities of genuine carnauba wax. This innovative formula incorporates a proprietary blend of cleansers and surface lubricants, ensuring a streak-free, mirror-like shine upon application.

Product Description:
The distinctive orange-soda-colored liquid concentrate is versatile and can be effortlessly applied to vehicles using a car washing foam gun or a conventional bucket and rag method. Available in sizes ranging from 16 ounces to one gallon, the product caters to various user preferences and needs.

Testing Methodology:
To assess the effectiveness of Armor All Ultra Shine Wash & Wax, a practical test was conducted on the first summer-like day in May. The test involved the application of the product to a pickup truck, utilizing a hose, bucket, and sponges for the washing process.

Washing Procedure:
Following the manufacturer’s recommendation of just under an ounce-and-a-half of soap concentrate per gallon of water, a measured amount of three ounces was mixed with two gallons of water. Despite initial concerns about the limited suds produced, the washing process commenced. Starting from the roof and working downward, each side of the truck was scrubbed, periodically inspecting for any missed spots. Beads forming on windows or mirrors were wiped off before progressing to the next side.

Additional Steps and Observations:
Special attention was given to tires and wheels, with a final inspection ensuring thorough cleanliness. During this process, a film buildup was noted, likely resulting from the product drying on the truck’s surface. Swift resolution was achieved by effortlessly buffing out the film spots with a dry cloth. The entire process was efficient, requiring minimal effort, and concluded with a thorough cleanup.

This detailed evaluation provides insights into the application, performance, and outcomes of Armor All Ultra Shine Wash & Wax, offering a comprehensive understanding of its capabilities in delivering a pristine, polished finish to vehicles.

November 17, 2023 0 comment
0 FacebookTwitterPinterestEmail
Detailing

Refining the Details: 6 Tips for Masterful Deck Building

by auto_motivex November 15, 2023
written by auto_motivex

Constructing a deck is a widely embraced do-it-yourself (DIY) project, appealing to individuals ranging from seasoned professionals to weekend enthusiasts. The desire for an ideal outdoor relaxation space during warm weather motivates many to embark on such endeavors. However, the process entails substantial effort, spanning from meticulous planning to the application of finishing touches. As the old saying goes, “the devil’s in the details,” emphasizing the need for precision in positioning joists, ensuring uniform spacing of railings, and attending to other critical aspects.

The inclusion of deck stairs depends on the specific type of deck under construction, an aspect not delved into within this discussion. Nevertheless, should the need for deck stairs arise, the same meticulous attention to detail applies.

Streamlining Deck Joist Installation

This paper presents six valuable tips for constructing decks, with a focus on achieving meticulous precision throughout the process. The first tip advocates for simplifying deck joist hanging, particularly when working alone. A practical approach involves attaching joist hangers to the ledger board before joist installation, ensuring proper alignment and height. To facilitate this process, a custom jig is recommended, constructed from a 5 x 12-inch plywood piece and a 2×4 of matching joist width. The jig is affixed to the ledger, securing the joist hanger in place with galvanized nails. Attention to the average width of joists is crucial, allowing for adjustments as needed, such as notching or shimming to accommodate variations. These tips collectively contribute to achieving precise and well-constructed decks.

Precision Techniques in Deck Construction: Notching and Baluster Spacing Strategies

Achieving accuracy in deck construction involves employing meticulous techniques for tasks such as cutting notches around deck posts and spacing deck balusters. This paper explores two key strategies for enhancing precision in these aspects of deck building.

Cutting Accurate Notches

To achieve the most accurate notches around a deck post, it is recommended to tightly hold the deck board against the post and transfer the post’s location to the board using a combination square. The depth of the notch should be measured and marked with precision. Careful attention is required when measuring the depth, as posts may exhibit twists, leading to unequal measurements on either side. The notches can be precisely cut using a jigsaw, ensuring a seamless fit.

Spacing Deck Balusters with a Jig

The use of jigs is favored by carpenters for its efficiency in simplifying and expediting tasks. A practical jig designed for constructing deck railings facilitates the centering of balusters on 3-1/2 in. wide rails and maintains a consistent spacing of typically 4 in. or less between them. When attaching balusters, it is advisable to start from the center, ensuring that the remaining space on each end is equal. To optimize the overall length, careful measurement in advance is essential. Commencing with a baluster in the exact center or with an opening centered is recommended, depending on which approach brings the space between the last baluster and the post closest to the desired 4-inch maximum baluster opening. These strategies collectively contribute to the precision and efficiency of deck construction.

Enhancing Aesthetic and Structural Precision in Deck Construction: Strategies for Straightening, Trimming, and Crafting Post Caps

This paper delves into critical techniques for achieving precision and aesthetic appeal in deck construction, specifically focusing on straightening bowed deck boards, trimming deck boards for optimal straightness, and crafting beveled post caps.

Straightening Bowed Deck Boards

Addressing inherent bowing in deck boards is a customary aspect of deck construction. To rectify this, the recommended approach involves setting the board with the bow inward, nailing one end, and systematically leveraging a chisel into the joist as the board is secured to maintain alignment with spacers. This ensures a tight and secure fit between the deck board and the joist.

Trimming Deck Boards Perfectly Straight

Achieving flawless edges on trimmed decking is imperative for the overall aesthetic. Employing a guide board screwed onto the decking facilitates a crisper edge than manual trimming. To ensure precision, a straight board is secured as a guide for the circular saw, aligning the saw plate parallel to the decking and maintaining a tight relationship with the guide. Use of a 2×2 requires careful sight alignment to guarantee straightness, and for the last two boards, a chalk line aids in maintaining a straight, steady motion during freehand cutting.

Crafting a Beveled Post Cap

Adding a cap to rail posts not only enhances the deck’s visual appeal but also protects the vulnerable end grain from environmental elements. While caps for 6x6s may necessitate special ordering, this paper proposes a cost-effective solution by crafting custom caps from 2×10 material. A jig, constructed from 16-inch pieces of 2×8 framing and 1/2-inch plywood, guides the circular saw in creating beveled post caps. The adjustment of the plywood guide requires precision to achieve a slight reveal on the cap’s top. Securing the cap to the posts is accomplished with construction adhesive and 3-inch galvanized finish nails, providing both structural integrity and aesthetic enhancement.

November 15, 2023 0 comment
0 FacebookTwitterPinterestEmail
Utility Trailers

Enhancing Your Trailer Experience: Must-Have Gear and Accessories

by auto_motivex November 14, 2023
written by auto_motivex

Maximize Your Trailer’s Utility with Innovative Accessories

Bid farewell to bruised shins with the addition of a ShinShield protective rubber cushion to your ball mount. This ingenious accessory is designed to curve downward, providing a barrier against contact with both the sides of the ball mount and the ball stud, ensuring a safer trailer experience.

Say goodbye to the Three Stooges’ moments during tie-downs with the revolutionary Hook-Tight. Ratcheting tie-down straps are essential for securing trailer contents, and Hook-Tight keeps them securely in place while you work. Available in packs of four online or at select home centers, this product is a worthwhile investment, eliminating the frustration of straps falling off during the tying process.

Streamline the trailer hookup process with the iBall trailer hitch camera, the ultimate solution for those tired of the traditional hassle. The monitor conveniently plugs into the truck’s power port (commonly known as the cigarette lighter), while the camera, equipped with a magnet, can be effortlessly attached to either the truck or trailer. Optimize your view by placing the camera on the tailgate for a convenient overhead perspective.

Aluminum Jack for Tandem Wheels

The wedge-shaped aluminum EZ Jack, readily available at Cabelas, emerges as an ideal solution for trailers equipped with tandem wheels. The operational procedure is as follows: commence by loosening the lug nuts on the flat tire. Subsequently, insert the EZ Jack under the inflated front tire and either pull the entire trailer forward or, in the case of a flat front tire, place it on the back wheel and drive backward. Following this maneuver, secure the opposite side with a chock, proceed to interchange the tires, effortlessly stow the lightweight EZ Jack in your truck, and resume your journey promptly.

Emergency Trailer Lights

For trailer owners, anticipating taillight malfunctions is practically inevitable. To address this concern, it is prudent to keep a battery-powered bicycle taillight in your vehicle’s trunk. In the event of a taillight failure, affix the bike light to your trailer, serving as a visual signal to fellow motorists and potentially deterring law enforcement attention. However, it is imperative not to view this as a permanent remedy; prompt resolution of the underlying taillight issue is advised.

Additional tip: Ensure the availability of a spare tire and a wrench tailored for the lug nuts on your trailer wheels, as the lug wrench of your truck may not be compatible.

Truck Bed Accessibility

Facilitating the loading and unloading of tools and materials from a truck bed, the HitchMate Truck Step proves to be a valuable accessory. Simply insert it into any standard 2-inch trailer hitch receiver, secure it with the lock pin, and release the spring-loaded retainer knob to extend the bar fully to 23-1/2 inches. This strategic placement ensures the step is conveniently located at the end of your open tailgate. Upon completion, effortlessly retract the step, pull the retaining pin, and neatly stow the entire unit under your truck bed for efficient storage.

Addressing a Stubborn Ball Mount

When faced with a rusted ball mount firmly lodged in your trailer hitch, refrain from resorting to brute force with a sledgehammer. Opt for a more strategic approach by acquiring a can of CRC Freeze Off penetrating spray, an air chisel, and a hammer bit. Execute the following procedure for optimal results: Begin by applying the CRC Freeze Off spray to the hitch receiver’s opening. This particular penetrating fluid induces metal contraction, aiding in the disruption of the rust seal. Utilize the air chisel equipped with the hammer bit to dislodge the rusted components. The air hammer effectively breaks up the rust, disperses the penetrant, and liberates the ball mount. Once freed, gently tap the rusted ball mount out using a hammer. If you intend to reuse the rusted mount, consider applying a coat of rust converter or waterproof marine grease for preservation.

Robust Steel Trailer Locks

Conventional coupler “latch locks” often prove insufficient against trailer thieves, who can swiftly dismantle them with minimal effort. For enhanced security, employ a coupler lock that presents a formidable challenge to potential thieves. The Trimax Universal Coupler Lock, depicted here, exemplifies this level of protection. Simply insert the ball into the coupler and slide on the U-bracket. Unless a thief invests the time to unbolt the entire coupler and install a new one, your trailer remains well safeguarded.

Deter Trailer Thieves Effectively

For trailers of substantial value, bolster your security measures by incorporating a “boot”-style lock in conjunction with the coupler lock. Numerous styles are available, but the Trimax TCL75 Wheel Chock Lock stands out for its dual functionality as both a wheel chock and a lock. Simply slide it onto the wheel and engage the lock cylinder to prevent both theft and unintended rolling of the trailer.

November 14, 2023 0 comment
0 FacebookTwitterPinterestEmail
Truck

Cut Costs with DIY Truck Repairs

by auto_motivex November 13, 2023
written by auto_motivex

Saving money with do-it-yourself (DIY) truck repairs is a cost-effective approach that empowers individuals to tackle maintenance and fixes on their own. Engaging in DIY truck repair not only helps cut down on labor expenses but also fosters a sense of self-reliance and skill development. By taking the initiative to handle routine maintenance tasks and minor repairs independently, individuals can enhance their understanding of their trucks, troubleshoot issues promptly, and ultimately reduce the overall financial burden associated with professional services. Embracing a DIY mindset in truck repair not only saves money but also promotes a hands-on connection with your vehicle, making the maintenance process both economical and rewarding.

Embarking on do-it-yourself (DIY) truck repairs necessitates a toolkit that can handle a range of tasks. Here’s a list of essential tools to have on hand for effective and efficient DIY truck maintenance:

  1. Wrench Set: A comprehensive set of wrenches, including both open-end and socket wrenches, is vital for various bolt and nut sizes.
  2. Screwdriver Set: Ensure you have both flathead and Phillips-head screwdrivers to tackle a variety of fasteners.
  3. Pliers: A versatile tool for gripping, bending, and cutting, pliers come in handy for multiple applications.
  4. Jack and Jack Stands: These are crucial for lifting and securing the truck, providing a safe working environment.
  5. Socket Set: A socket set with various sizes is essential for removing and tightening nuts and bolts.
  6. Oil Filter Wrench: Specifically designed for removing and installing oil filters during oil changes.
  7. Oil Drain Pan: To catch and dispose of used oil during oil changes.
  8. Funnel: Facilitates the clean and precise pouring of fluids, such as oil and coolant.
  9. Torque Wrench: Essential for achieving accurate torque when tightening bolts to specific specifications.
  10. Brake Bleeder Kit: Useful for bleeding the brake system and maintaining proper brake fluid levels.
  11. Battery Charger or Jump Starter: Ensures your vehicle’s battery is charged, preventing starting issues.
  12. Tire Pressure Gauge: Regularly check and maintain proper tire pressure for safety and fuel efficiency.
  13. Multimeter: A versatile tool for checking electrical systems, including fuses and wiring.
  14. Lug Wrench and Tire Iron: Essential for changing flat tires.
  15. Work Gloves and Safety Glasses: Protect your hands and eyes during repairs.
  16. Creeper: Makes it more comfortable to slide under the truck when working underneath.
  17. Diagnostic Code Reader: Helps identify issues by reading the truck’s onboard diagnostics system.
  18. Haynes or Chilton Repair Manual: Specific to your truck’s make and model, providing valuable guidance on repairs and maintenance.

By having these tools at your disposal, you’ll be well-equipped to handle a variety of DIY truck repairs and routine maintenance tasks, saving both time and money in the process.

Engaging in do-it-yourself (DIY) truck repairs is a practical and cost-effective approach for various levels of damage, but it’s crucial to assess the complexity and safety implications of the repair task. Generally, DIY repairs are well-suited for the following levels of truck damage:

  1. Routine Maintenance: DIY is ideal for routine maintenance tasks such as oil changes, air filter replacements, and fluid top-ups. These activities are relatively simple and don’t require advanced technical skills.
  2. Minor Repairs: Small-scale repairs, such as replacing spark plugs, light bulbs, or worn-out belts, are often well within the capabilities of a DIY enthusiast. These tasks typically involve straightforward procedures that can be accomplished with basic tools.
  3. Brake System Maintenance: DIY repairs for brake pads and rotors replacement, as well as brake fluid bleeding, are common and feasible for individuals with a moderate level of mechanical aptitude. However, extensive brake system overhauls may require professional expertise.
  4. Battery Replacement: Swapping out a truck battery is a straightforward task that many DIYers can handle safely. Just ensure proper disposal of the old battery in accordance with environmental regulations.
  5. Tire Changes and Repairs: Changing a flat tire or repairing minor punctures is well within the DIY realm. This includes tasks like tire rotation and maintaining proper tire pressure.
  6. Exhaust System Repairs: Patching small holes or replacing a section of the exhaust system can be tackled by DIYers, though extensive exhaust system issues might require professional attention.
  7. Electrical System Issues: DIYers can troubleshoot and replace fuses, bulbs, and some electrical components. However, complex electrical problems may need professional diagnostics.

It’s important to note that while DIY repairs are suitable for many common issues, certain types of damage and repairs are best left to professionals. Extensive engine overhauls, complex transmission repairs, and intricate electronic system troubleshooting often require specialized knowledge, tools, and expertise.

Additionally, safety should always be a priority. If a repair involves critical safety systems such as brakes or steering, or if the complexity of the task surpasses your comfort level or expertise, seeking professional assistance is advisable to ensure the safety and reliability of your truck.

November 13, 2023 0 comment
0 FacebookTwitterPinterestEmail
Newer Posts
Older Posts

Recent Posts

  • Effective Cleaning Methods for Tonneau Covers
  • Approaches to Retain the Enchanting New – Car Fragrance
  • Optimal Car Trash Can Choices
  • Optimal Strategies for Cleaning and Maintaining Truck Running Boards
  • 环保型机油处理与回收

Recent Comments

  • Korey on What is the Recommended Frequency for Motorcycle Oil Changes?
  • Greg on What is the Recommended Frequency for Motorcycle Oil Changes?
  • Reye on Transporting Cargo with Pickup Trucks
  • mark on How to Properly Hook Up a Trailer?
  • marcus on What is the Recommended Frequency for Motorcycle Oil Changes?
  • Facebook
  • Twitter

@2020 - All Right Reserved. Designed and Developed by Auto-Motivex


Back To Top
Auto Motivex
  • Detailing
  • Motorcycle
  • Parts
  • Truck
  • Utility Trailers
  • Blog