• Detailing
  • Motorcycle
  • Parts
  • Truck
  • Utility Trailers
  • Blog
Auto Motivex
keep your memories alive
Detailing

Best Headlight Restoration Kits for Clearer Vision

by auto_motivex October 19, 2023
written by auto_motivex

Over time, plastic headlight covers tend to develop issues like fogging, yellowing, or scratching, which can significantly reduce both their effectiveness and visual appeal. Fortunately, you don’t have to accept diminished visibility and unattractive headlights. By utilizing specialized headlight restoration kits, you can restore your lights to a nearly pristine condition, making them look almost as clear as when you first acquired your vehicle. Of course, achieving these results may require some time and effort on your part.

Today’s headlight restoration kits offer more than just a temporary cosmetic improvement; they are designed to rejuvenate your headlights to a condition close to their original state. Whether you are an experienced DIY enthusiast or a novice looking to bring back your car’s shine, there is a kit suitable for your needs. In this article, we will showcase the top headlight restoration kits of 2023.

Factors to Consider When Purchasing a Headlight Restoration Kit.Before embarking on your quest for the ideal headlight restoration kit, it’s essential to keep a few key considerations in mind. Here’s what you should be on the lookout for:

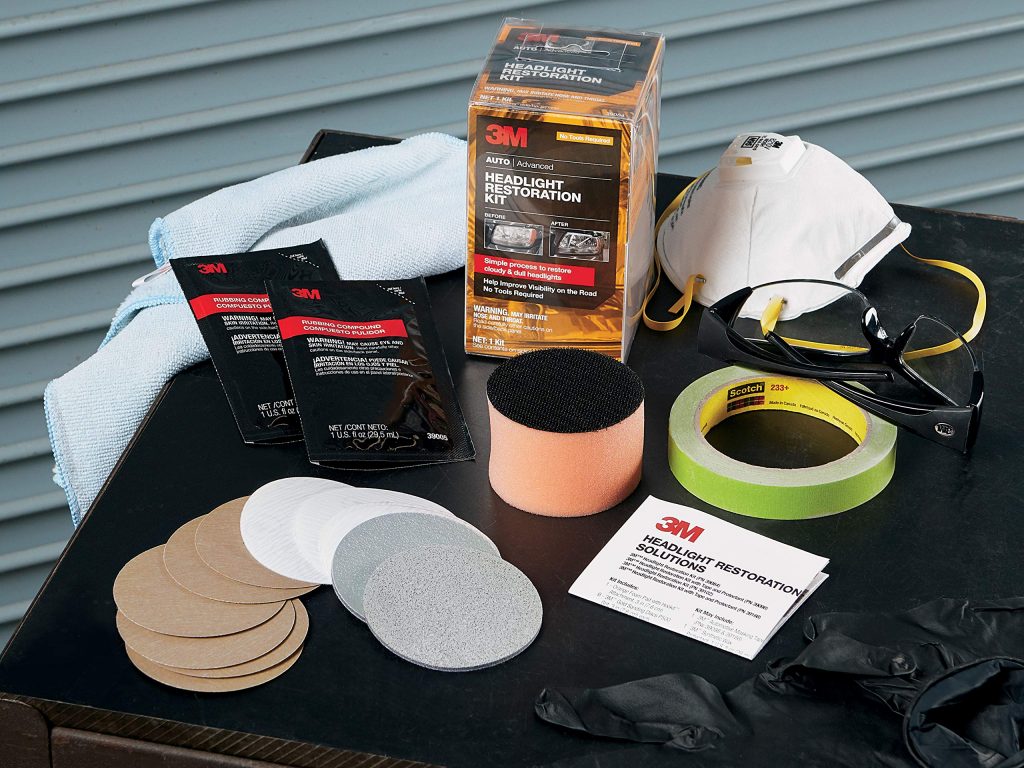
  • Type of Kit: Headlight restoration kits come in various types. Some are comprehensive, all-in-one solutions that contain all the necessary components, while others may necessitate the use of additional tools or products. For example, some kits may feature multiple abrasive solutions that must be used with drill-attached applicators for a more intensive restoration process. In contrast, less complex kits may provide a hand applicator and a cleaning wipe for a simpler application.
  • Longevity: It’s advisable to seek out kits that not only restore the headlights but also offer UV protection to prolong the clarity of the restoration. UV protection is typically available in the form of a special solution or wipe that you apply using an applicator. Keep in mind that the effectiveness and duration of UV protection can vary among different kits. Additionally, factors such as your vehicle’s storage conditions, your geographic location, and the local climate can impact the longevity of the restoration.
  • Skill Level: Be certain that the chosen kit corresponds to your level of DIY expertise. Some kits may demand a higher skill level than others. It’s essential to thoroughly review the instructions before purchasing the kit to avoid undertaking a more complex task than you’re comfortable with.
  • Safety: Prioritize your safety at all times. Utilize protective eyewear and gloves, and ensure that you’re working in a well-ventilated area. If a drill is involved for mechanical cleaning, take precautions to prevent any sensitive components from being exposed to chemical residues that might be inadvertently dislodged from the applicator.
  • Compatibility: While most headlight restoration kits are generally suitable for vehicles equipped with plastic headlights, it’s advisable to carefully review all instructions. This ensures that you apply and complete the restoration process as recommended by the manufacturer.

Cerakote’s Ceramic Headlight Restoration Kit is a comprehensive package designed to rejuvenate and safeguard your headlights. The process involves multiple steps. Initially, the use of Cerakote’s exclusive Oxidation Remover Wipes is employed to prepare the headlight surface. The subsequent step involves wet-sanding the headlight’s surface, utilizing the included surface prep pad and discs to eliminate deep oxidation and minor scratches. After the surface is adequately prepared, the application of Cerakote’s ceramic coating wipes is performed to both restore and shield the plastic, preventing future oxidation.

It’s important to note that this kit does not comprise bottles of solution or necessitate the use of power tools, which might result in slightly less clarity restoration compared to other options. Nevertheless, it offers an excellent no-tool solution.

Meguiar’s offers a widely recognized, two-step Headlight Restoration Kit, known for its affordability and effectiveness, which doesn’t require any additional tools. This kit comprises a cleaning solution to enhance the clarity of the headlight lenses and a coating solution to provide extra protection. Additionally, two applicator pads are supplied with the kit.

For cases where more intensive cleaning is needed, Meguiar’s provides a Heavy Duty Headlight Restoration Kit. This alternative option includes Meguiar’s PlastX Polish, Headlight Coating Solution, and more aggressive cleaning pads. These consist of a sanding pad and a wool pad, which can be attached to a drill for more robust cleaning processes.

Mothers is well-known for its expertise in maintaining the appearance of vehicles, and their comprehensive NuLens Headlight Renewal Kit is no exception. While this kit necessitates the use of a drill (not provided), it offers all the essential components to restore your car’s headlights to their former glory.

The key component in this kit is Mothers’ Powerplastic 4Lights Polish, which is used in conjunction with the Powerball 4Lights Polishing Tool and restoration discs. Together, they effectively eliminate sun damage and discoloration from the plastic headlight covers.

Sylvania stands out as the sole company on this list that manufactures both headlights and offers a dedicated Headlight Restoration Kit. Their comprehensive three-step kit is equipped with all the necessary components for restoring clarity to sun-damaged headlights.

The kit begins with a surface activator, specially formulated to prepare the headlight’s surface for the subsequent sanding and polishing steps, facilitated by the included Clarifying Compound. Once the surface is effectively polished, a UV Block Clear Coat is applied to safeguard against future UV damage. While this kit doesn’t include fancy applicators, it provides various grits of sandpaper, along with polish cloths and gloves for the precise application of the clear coat and clarifying compound.

Suppose you happen to already possess applicator pads and tools. In that case, Chemical Guys’ one-step Headlight Restore and Protect solution offers a swift and cost-effective means to eliminate yellowing and imperfections from your headlights.

Apart from headlight polishing through its micro-abrasive cream formula, this solution incorporates a full-synthetic wax sealant that acts as a barrier against UV rays, preventing future yellowing of the plastic. While utilizing a drill-powered tool can expedite the process and yield enhanced results, you can also achieve favorable outcomes by applying this solution with a microfiber towel or sponge, coupled with a robust effort of manual application.

What are the leading causes of headlight fogging or yellowing over time?

The primary factor is UV radiation from the sun, which results in plastic degradation. Additionally, other contributing elements encompass road debris, chemicals, and contaminants to which headlights are consistently exposed.

How long is the typical duration of the effect achieved with a headlight restoration kit?

Subject to appropriate application and the kit’s quality, restored headlights can retain their clarity for a period ranging from six months to several years. Premium kits often incorporate UV protection, further extending the restoration’s longevity.

Are these kits suitable for use on the headlights of any vehicle?

Most headlight restoration kits are universally designed and can be applied to a broad spectrum of vehicles, including cars, trucks, and motorcycles. Nonetheless, it is advisable to review the product specifications to ensure compatibility.

Is it safe to undertake headlight lens restoration independently, or is it preferable to engage professional services?

Numerous headlight restoration kits, including all those featured in this compilation, are formulated for user-friendly DIY application, furnished with comprehensive, step-by-step instructions. Provided you are comfortable adhering to instructions and are willing to invest the necessary time, you can attain excellent results at home. Nevertheless, if uncertainty arises, it may be prudent to consider professional assistance, if only for the sake of peace of mind.

October 19, 2023 0 comment
0 FacebookTwitterPinterestEmail
Detailing

Efficient Fall Gardening: Quick 5-Minute Tasks

by auto_motivex October 16, 2023
written by auto_motivex

Before the arrival of snow, allocate a few minutes to complete these essential garden tasks to ensure your yard is well-prepared for the winter season. Winter is approaching rapidly, whether we’re prepared or not. For a considerable number of individuals, winter signifies the conclusion of outdoor gardening activities. Prior to concluding your gardening activities for the season, invest a brief period addressing some last-minute garden chores. These straightforward tasks do not require an extensive amount of time but will significantly enhance the gardening experience once the spring season finally arrives.

Marking Plant Locations

Now is the opportune moment to employ robust plant markers to indicate the positions of any new perennials, bulbs, or seeds that might slip your mind by the time spring arrives. There is nothing more exasperating than accidentally uprooting seedlings in spring, mistaking them for pesky weeds, or inadvertently planting something atop another plant. You don’t need anything elaborate—consider using a permanent marker on a paint stirrer stick, finished with a coat of clear gloss spray enamel. It doesn’t need to be aesthetically pleasing; it just needs to endure until spring.

Protecting Your Roses

For rose enthusiasts, safeguarding their roses is an inherent gardening task. However, if you are new to cultivating roses or have a particular rosebush you wish to preserve, dedicating a few minutes to this task is invaluable. Trim tall canes and shield the roses with straw or evergreen boughs to shield the plants from cold temperatures. If using rose cones, ensure they have ventilation. Alternatively, you can cover the roses with dry leaves and wrap them in hardware cloth or burlap. Prior to the coverage, clear away any diseased leaf debris and apply a fresh layer of mulch to your flower beds.

Lift Delicate Bulbs

Certain plants thrive outdoors during the summer but are susceptible to the harshness of winter. Examples of such plants include dahlias, gladioli, and tuberous begonias, depending on your geographical location. Lifting these plants typically involves careful excavation, thorough removal of excess soil, allowing the bulbs or tubers to air-dry, and meticulous storage in a cool, dry place for the winter (garages often prove to be suitable, but ensure protection against mice).

Clean and Maintain Your Tools

While it’s true that this garden task might exceed a five-minute timeframe, contingent on the number of tools you possess, the fall season is the opportune moment to ensure their proper maintenance. At the very least, give all your tools a thorough rinse with a garden hose to eliminate any surplus dirt and allow them to dry completely before storing them, thereby preventing rust.

Embrace the Leaves

This final task is the quickest, yet it requires a considerable amount of willpower. For many of us, we were raised with the belief that we must tidy up our yards in the fall, clearing away all the fallen leaves. However, the truth is that removing all the leaves might do more harm than good. Numerous organisms overwinter within that leaf litter, including butterfly larvae and chrysalises. The leaves naturally decompose in your garden beds due to winter weather, enriching the soil with valuable organic matter. Moreover, the leaves offer shelter and warmth to wildflowers and other plants growing beneath. Simplify your fall routine—consider leaving at least some of the leaves undisturbed.

October 16, 2023 0 comment
0 FacebookTwitterPinterestEmail
Detailing

Spend a Night in a Potato: Here’s All the Information You Need

by auto_motivex October 15, 2023
written by auto_motivex

The potato house, also known as the Big Idaho Potato Hotel, is a unique and innovative lodging concept that has gained attention for its distinctive architecture and creative use of space. Designed to resemble a giant potato, the structure stands as an epitome of unconventional and imaginative architecture. The exterior closely resembles a potato, capturing its shape and texture, while the interior has been transformed into a comfortable living space.

Inside the potato house, guests can find a cozy and stylishly designed accommodation, despite the unconventional shape. The interior is tastefully furnished, providing modern amenities and comforts. Although windows are not a prominent feature, a small lookout in the bathroom allows guests to enjoy stargazing during their stay. The bathroom, housed in a customized silo, continues the theme of lush greenery seen throughout the lodging. It offers a unique and relaxing experience, often described as a “spa retreat perfect for soaking while looking up at the stars.”

The potato house has garnered attention for its novelty and creativity, offering an extraordinary lodging option for travelers seeking a one-of-a-kind stay. With its intriguing design and attention to detail, it has become a standout choice in the realm of unconventional accommodations.

From picking and mashing potatoes to spending a night in one?

Thanks to an exceptionally creative Airbnb host, spending a night in a colossal potato in Boise, Idaho is now a reality. For those enchanted by the idea of Idaho potatoes, the dream of waking up in one is finally within reach.

Kristie Wolfe is the visionary behind the Big Idaho Potato Hotel. Having previously served as a spokesperson for the Big Idaho Potato Tour, she embarked on her dream of crafting a treehouse. Not only did she bring one treehouse to life, but she expanded to create two treehouses, an “Underground Hygge” resembling a hobbit hole from J.R.R. Tolkien’s Lord of The Rings, and now, the Big Idaho Potato Hotel.

Wolfe’s most recent starchy creation was officially inaugurated on April 22 of the current year. As per the Airbnb listing, the potato was repurposed from the Big Idaho Potato Tour by the Idaho Potato Commission. This massive potato traveled across 48 different states on the back of a semi-truck over a span of seven years, weighing an impressive six tons. Presently, it is situated on a 400-acre farmland just south of downtown Boise, making it an ideal lodging option for those checking Boise off their travel bucket list.

Although the exterior of the potato mirrors its namesake, the interior exudes a chic and stylish ambiance. The interior of the potato has been painted white, adorned with light pink chairs as accents and abundant greenery. A small shelf displaying knick-knacks is positioned across from the accent chair. Toward the entrance, a petite kitchenette is equipped with a tea kettle, a sink, and a compact refrigerator. The queen-sized bed is situated towards the back of the potato, beneath a distinctive chandelier made of antlers.

While the interior of this lodging doesn’t feature windows, the bathroom offers a small lookout, providing a view of the starry nights. Positioned separately from the potato structure, the bathroom is creatively housed within a customized silo. It incorporates a compact metal tub with a showerhead, surrounded by lush greenery. At the top of the silo, there’s a small window, and based on available images, an indoor furnace appears to be present. Described by Wolfe in her listing as “a spa retreat perfect for soaking while looking up at the stars.”

Given the recent addition of the Big Idaho Potato Hotel to Airbnb, there are limited reviews of the space at present. However, drawing from the feedback and ratings of her other Airbnb listings, it’s evident that Wolfe’s latest Airbnb venture is on track to achieve great success. A single night’s stay at the Big Idaho Potato Hotel is priced at $200, with the next available booking slot not until June.

October 15, 2023 0 comment
0 FacebookTwitterPinterestEmail
Parts

8 Essential Replacement Parts for Your Pressure Washer

by auto_motivex October 14, 2023
written by auto_motivex

Locating Pressure Washer Components A pressure washer serves as an excellent tool for thoroughly cleaning the exterior of your residence and yard. However, akin to any apparatus, its constituent parts undergo gradual wear and tear, necessitating eventual replacement or upgrading.

In this discussion, we will concentrate on electric and light-duty gas-powered pressure washers, predominantly employed by do-it-yourself (DIY) enthusiasts. In the event that a particular component is not readily available, the likelihood of finding it online or at a specialized store is quite high. A recommended initial step involves inquiring at the establishment where the pressure washer was originally purchased.

We shall elucidate the pressure washer components that are most frequently subject to replacement, elaborate on techniques for accurately identifying suitable replacement parts, and provide approximate cost estimates.

1.Nozzle Tips

Nozzle tips may experience damage, loss, or wear over time. The compatibility of nozzles largely depends on the size and type of the connector, as well as the pressure washer’s PSI (pounds per square inch) rating. If uncertain about these specifics, referring to the user manual is advisable. In the absence of a manual, conducting an internet search is recommended, as many manufacturers and third parties make manuals available online. Given that nozzle tips are frequently interchanged, most are designed for quick connect couplings. It is prudent to look for the abbreviation ‘QC’ in the product description to confirm quick connect compatibility.

2.Spray Guns

The handheld control device on a pressure washer is known as a spray gun. While various designs exist, in most instances, pressurized water is directed from the pump to the rear of the gun, where a ball valve holds it in place. Pulling the trigger activates the valve, enabling the water to be released through the front of the gun. Similar to nozzle tips, it is important to ensure that a replacement spray gun is compatible with the connectors and PSI rating of your pressure washer. A notable example is the replacement spray gun offered by Mingle. It is worth examining due to the informative images provided, illustrating the necessary measurements for determining compatibility. Additionally, this product is supplied with a pair of interchangeable rear connectors, each compatible with a different set of manufacturers.

3.Lances and Wands

In pressure washer applications, spray guns can be directly used in conjunction with a nozzle tip or an extension device known as a lance or wand. (If the spray gun integrates an extension, the entire assembly may be referred to as a wand.) It is imperative to replace a bent or damaged wand. Fundamental pressure washer wands typically consist of straight tubes with a screw-on adapter for gun connection and a nozzle connection at the other end. An illustrative example of a wand extension is the Surface MaxxPro wand. It is important to note that it utilizes an M-22 male adapter for gun connection; thus, confirming compatibility with existing hardware is advised.

4.Power Washer Pumps

While the spray gun serves as the control interface, the pump functions as the core of a pressure washer. Driven by the engine, the pump is responsible for generating pressure, transforming ordinary garden hose water into a potent cleaning spray. The majority of pressure washer pumps share essential components, yet discrepancies exist in manufacturing and machining, rendering the parts of one model incompatible with another.

5.Power Washer Engines

Residential pressure washers are primarily classified into two types: electric-powered and gas-powered. Irrespective of the power source, the functionality of the engine is crucial; without it, a pressure washer cannot generate pressure. In case the engine encounters issues, it can either be repaired or replaced. Generally, electrical motors pose more challenges for repairs. While specific components such as a GFCI plug can be replaced, most electrical pressure washer engines are designed for replacement rather than repair. Conversely, gas engines are more conducive to DIY repairs.

6.Hoses

Pressure washer hoses endure considerable stress. They are subjected to harsh conditions, dragged over rugged surfaces, forced into tight bends, and filled with pressurized liquids, ultimately leading to wear and tear. A replacement hose with a diameter of 1/4 inch, exemplified by this 50-foot Flexzilla, meets specifications of 3,100 PSI. If the pressure washer operates at a higher PSI, opting for a thicker 3/8-inch hose is advisable. Maintaining the same diameter as the original hose that came with the washer is generally a suitable choice.

7.Cart and Frame Components

Pressure washers possess considerable weight due to components such as the motor, pump, coiled hose, and various accessories. To enhance mobility and ease of use, it is essential for the unit to be mounted on a frame with wheels. However, if these wheels become damaged or the frame weakens, the efficiency and utility of the pressure washer can be significantly compromised. Replacing a broken wheel or axle is a relatively straightforward task. Simply measure the diameter of the original component and proceed to locate suitable replacements at a local hardware store. Strive to find a match with the original specifications; however, a replacement akin to this 10-inch rubber tire is likely to function adequately.

8.Filters and Inlets

Filtration plays a pivotal role in the functionality of most engine types, and pressure washers are no exception. Gas engines in pressure washers necessitate regular oil changes and air filter replacements. In addition to these, pressure washers are equipped with another critical filter—the pump’s intake filter connected to the garden hose. This pressure water filter aids in bubble dispersion and serves to prevent the entry of foreign particles into the pump.

October 14, 2023 0 comment
0 FacebookTwitterPinterestEmail
Truck

Enhanced Security for Truck Storage: A Comprehensive Solution

by auto_motivex October 13, 2023
written by auto_motivex

A secure truck storage solution is a vital component for ensuring the safety and protection of valuable items, equipment, and tools during transportation. It involves implementing measures and utilizing specialized storage systems within trucks to prevent theft, damage, or unauthorized access.

1、Locking Mechanisms: Implement robust locking mechanisms such as high-security padlocks, deadbolts, or electronic locks to secure access points like doors, compartments, and hatches.

2、Steel Construction: Utilize strong and durable steel construction for storage compartments, ensuring they can withstand external force and tampering attempts.

3、Reinforced Doors and Panels: Strengthen doors and panels with additional layers of steel or reinforcement bars to enhance resistance against break-ins or forced entry.

4、Tamper-Evident Seals: Use tamper-evident seals to detect any unauthorized attempts to access or tamper with the storage compartments during transit.

5、Surveillance and Monitoring: Integrate security cameras and monitoring systems within the truck to keep a constant eye on the stored items and deter potential thieves.

6、Alarm Systems: Install alarm systems that trigger alerts in case of unauthorized access, ensuring immediate action can be taken to address the security breach.

7、GPS Tracking: Implement GPS tracking devices to monitor the truck’s location, enabling real-time tracking and recovery in case of theft.

8、Remote Monitoring and Control: Utilize remote monitoring and control systems, allowing authorized personnel to access and manage the storage compartments using a secure digital platform.

9、Customizable Compartments: Design compartments that can be customized to accommodate specific types of equipment and items, optimizing space utilization and organization.

10、Access Control: Implement access control measures such as biometric authentication or smart card systems to restrict access to authorized personnel only.

11、Regular Maintenance and Inspections: Conduct regular maintenance and inspections to ensure the functionality and effectiveness of the security features, addressing any issues promptly.

In summary, a secure truck storage solution incorporates robust construction, advanced locking mechanisms, electronic surveillance, and remote monitoring to provide a comprehensive safeguard for valuable items during transportation.

October 13, 2023 0 comment
0 FacebookTwitterPinterestEmail
Utility Trailers

Preparing and Connecting a Trailer: A Step-by-Step Guide

by auto_motivex October 12, 2023
written by auto_motivex

Hooking up a trailer involves several crucial steps to ensure a safe and secure connection between your vehicle and the trailer. Follow these steps for a successful trailer hookup:

1.Choose the Right Hitch:

Ensure your vehicle has a compatible hitch for the type of trailer you are using. There are various hitch types, including ball hitches, gooseneck hitches, and fifth-wheel hitches.

2.Check Your Vehicle’s Capacity:

Confirm that your vehicle can safely tow the trailer’s weight. Refer to your vehicle’s manual for its towing capacity and ensure it exceeds the trailer’s weight.

3.Inspect the Trailer: Check the trailer for any damage or issues, including lights, tires, brakes, and safety chains. Ensure everything is in good working condition.

4.Position the Trailer:

Park the trailer on a level surface, aligning it straight with the vehicle. Ensure the trailer is in line with the hitch on your vehicle.

5.Lower the Trailer Coupler:

Lower the trailer coupler onto the hitch ball attached to your vehicle. Make sure the coupler fully encloses the hitch ball.

6.Secure the Coupler:

Lock the coupler in place using the latch or locking mechanism provided. Check for a secure connection by attempting to lift the trailer tongue.

7.Connect Safety Chains:

Cross the safety chains under the trailer tongue and attach them to the vehicle. This provides a backup connection in case the main hitch fails.

8.Attach Brake and Electrical Connections:

Connect the trailer’s brake and electrical cables to your vehicle. This ensures the trailer’s brakes and lights synchronize with your vehicle.

9.Check Lights and Signals:

Test all trailer lights and signals to ensure they are functioning correctly, including brake lights, turn signals, and running lights.

10.Perform a Final Check:

Double-check all connections, couplings, and safety measures to ensure everything is secure and properly attached.

11.Load the Trailer:

Load your cargo onto the trailer, ensuring an even distribution of weight and proper weight capacity adherence.

12.Perform Safety Checks:

Before driving, perform a final safety check by testing the brakes, ensuring the load is secure, and rechecking all connections.

13.Drive with Caution:

Drive at a safe speed, giving yourself extra time and distance for braking. Be aware of the trailer’s added length and weight.

By following these steps and prioritizing safety, you can successfully hook up a trailer for your journey.

October 12, 2023 0 comment
0 FacebookTwitterPinterestEmail
Motorcycle

Guide to Purchasing a Motorcycle

by auto_motivex October 12, 2023
written by auto_motivex

1、Determine Your Riding Needs and Preferences

Before purchasing a motorcycle, consider your riding experience, preferred riding style, and intended use. Are you looking for a commuter bike, a sportbike for speed and agility, a cruiser for comfortable long rides, or an adventure bike for off-road excursions?

2、Set a Budget

Establish a clear budget for your motorcycle purchase, including costs for the bike, insurance, safety gear, maintenance, and any modifications or accessories you might want.

3、Research Motorcycle Types

Familiarize yourself with the various types of motorcycles available, such as cruisers, sportbikes, touring bikes, adventure bikes, and standard bikes. Understand the features and benefits of each type to determine what suits your preferences and needs.

4、 Consider Your Skill Level

Select a motorcycle that matches your skill level. If you’re a beginner, opt for a bike with a lower engine displacement and a comfortable riding position. Experienced riders can consider more powerful and specialized bikes.

5、Evaluate Engine Size and Performance

Choose an engine size based on your riding preferences. Smaller engines are ideal for city commuting and beginners, while larger engines provide more power and are suitable for highway cruising and sport riding.

6、Test Ride Several Models

Visit different dealerships and test ride various motorcycle models to get a feel for their comfort, handling, and performance. Pay attention to factors like ergonomics, suspension, braking, and acceleration.

7、 Check for Safety Features

Ensure that the motorcycle has important safety features such as ABS (Anti-lock Braking System), traction control, and proper lighting systems for enhanced visibility.

8、Inspect the Condition of the Motorcycle

If buying a used motorcycle, thoroughly inspect its condition. Check for signs of wear and tear, maintenance records, and any potential issues that may require repairs.

9、Consider Maintenance Costs

Research and estimate the maintenance costs associated with the specific motorcycle model you’re interested in. Some motorcycles may require more frequent or expensive maintenance.

10、Review Insurance Options

Check insurance rates and coverage options for the motorcycle you’re considering. Insurance costs can vary based on the type of motorcycle, your riding experience, and location.

11、Purchase Safety Gear

Invest in high-quality safety gear such as a DOT-approved helmet, riding jacket, gloves, boots, and riding pants. Safety gear is crucial for your protection while riding.

12、 Negotiate the Price and Terms

Negotiate the purchase price, financing options, warranties, and any additional accessories or services. Be prepared to walk away if the terms don’t meet your expectations.

13、 Complete the Purchase and Registration

Complete the paperwork, payment, and registration process to finalize the purchase. Ensure you have all the necessary documentation for a smooth transaction.

14、 Enroll in a Riding Course

Consider enrolling in a motorcycle safety course to enhance your riding skills and knowledge of safe riding practices.

15、 Enjoy Your Ride Responsibly

Once you’ve bought your motorcycle, ride responsibly, follow traffic rules, and continuously work on improving your riding skills for a safe and enjoyable riding experience.

Remember, safety should always be a priority when buying and riding a motorcycle. Enjoy the open road responsibly!

October 12, 2023 0 comment
0 FacebookTwitterPinterestEmail
Detailing

Perfecting Interior Car Detailing: A Pro’s Guide

by auto_motivex October 11, 2023
written by auto_motivex

Is your car’s interior in need of a refresh? Reclaim its shine through a professional-grade interior car detailing that you can undertake on your own.

Increasingly, individuals are opting for professional car washes to maintain their vehicles. As per the International Carwash Association, in 2019, 77 percent of drivers reported frequenting professional car washes, a significant increase from the approximately 48 percent reported in 1994. A comprehensive professional interior car detailing service can range from $75 to $150 or even higher, depending on your location and the extent of detailing required.

Car interiors naturally accumulate dirt, dust, and grime, and frequent visits to car washes and detailing centers can accumulate costs. However, armed with some knowledge and clever strategies, you can clean your car with the finesse of a professional detailer. In this article, we present before and after car detailing photos that will leave you amazed.

Step 1: Equip Your Cleaning Arsenal

Forgo common household cleaners and opt for automotive-specific car care products designed for the task. Using household items like dishwashing soap can potentially damage automotive paint, interiors, and plastic surfaces, warns David Bennett, AAA repair systems manager. In addition to car cleaning products, gather essential tools such as cotton swabs, plush makeup brushes, microfiber cloths, a scrubbing brush, and a vacuum cleaner with brush and crevice attachments. If you prefer an all-encompassing cleaning product set, covering both interior and exterior detailing, John Peterson, editor of Safe Drive Gear and a senior sales manager at an auto retail outlet, suggests considering the 16-Piece Arsenal Builder Car Wash Kit.

Step 2: Declutter Your Vehicle

Take out the floor mats, large items like car seats, bags, and any other substantial belongings you keep in your car. Mike Pennington, Meguiar’s director of global training, event marketing, and consumer relations, advises promptly removing any trash as well. “Keep a small trash bag within reach to dispose of waste while on the road,” Pennington suggests. “This way, you can easily discard the bag and replace it with a new one as needed.

Step 3: Strategize Your Interior Car Detailing Approach

Vehicles present an array of nooks, crannies, and crevices. Prior to embarking on the cleaning process, conduct a thorough assessment of your car’s interior. Take note of areas exhibiting noticeable dirt accumulation and spots that might go unnoticed during regular operation of the vehicle. Mike Pennington identifies frequently overlooked areas, such as the space beneath the seats (to be accessed with caution), floor mats, and the rear surfaces of sun visors. John Peterson highlights air vents, cup holders, and storage compartments. David Bennett underscores the cargo and trunk areas, which are often neglected. Ensure you address these areas diligently, mirroring the practices of professionals.

Step 4: Surface Cleaning and Vacuuming

Subsequently, proceed with vacuuming the car interior and meticulously wiping down surfaces. While this may seem straightforward, achieving a car detailing-grade cleanliness necessitates a meticulous approach to cover every nook and cranny. Strive to work from top to bottom, though acknowledge the likelihood of revisiting certain areas. The confined spaces of a car can allow dirt to disperse, requiring revisitation to ensure no crevice is missed. Bear these invaluable car detailing tips and techniques in mind as you navigate this rigorous step:

1. Pre-vacuuming:“Prior to vacuuming, utilize a soft, natural bristle brush to dislodge dirt from all interior surfaces,” recommends Bennett.

2. Don’t overlook the headliner: This pertains to the fabric covering the inner roof. “Wrap a microfiber towel around a rigid nylon brush, then lightly agitate the headliner after spraying it with an upholstery cleaner,” advises Pennington. “This technique prevents over-saturation of the headliner with the cleaner.”

3. Adjust seat positions: “When vacuuming the interior, adjust the front seats to their maximum forward and backward positions to reach beneath them,” suggests Bennett. For reclining seats, Pennington suggests moving them as far as possible in both directions to access hidden dirt.

4. Utilize your tools: The crevice attachment for your vacuum cleaner is designed to fit into confined corners. Make regular use of it during your car detailing. Employ cotton swabs and makeup brushes for tasks such as cleaning air vents and areas around buttons.

5. Choose products wisely: Opt for cleaning agents specifically formulated for the material being cleaned. Additionally, apply a conditioner or protectant to vinyl or leather surfaces, if needed.

6. Inspect the spare tire: While cleaning the trunk, Pennington recommends inspecting the spare tire to ensure it is in good condition. Verify the presence of all tire-changing tools as well.

7. Exercise caution while spraying: “Always apply your interior cleaning solution onto a towel or detailing brush to avoid streaks and potential damage to electronics,” cautions Peterson.

Step 5: Window

Cleaning In the final phase, focus on cleaning the windows. Utilize specialized window wipes for effective results. Even though the emphasis is on the car’s interior, any external grime will become apparent as you view the surroundings through your newly detailed car interior. Take the opportunity to also clean the exterior of the windows.

Step 6: Floor Mat Maintenance

Begin by removing any loose dirt from the floor mats by shaking them out. Follow this with a thorough vacuuming, and proceed to scrub the mats with hot water and an automotive carpet cleaner, adhering to the manufacturer’s guidelines. Allow the mats to air dry completely.

Step 7: Reorganization

Once the interior car detailing is complete, carefully place the fully dried car mats back in their designated positions. Return any belongings you wish to keep in your car to their respective places, and readjust the seats and mirrors to their original settings. Now, you’re all set to drive in your freshly cleaned vehicle.

October 11, 2023 0 comment
0 FacebookTwitterPinterestEmail
Parts

How to Identify Various Components of a Gas Grill

by auto_motivex October 10, 2023
written by auto_motivex

Comprehensive Understanding of Gas Grill Components and Common Replacement Items

Gas grills are an excellent tool for outdoor cooking, offering convenience and efficiency. However, like any appliance, they can experience wear and tear over time, necessitating replacements for various components. This understanding is crucial for ensuring a seamless grilling experience.

When it comes to gas grill maintenance and repairs, having knowledge about the different parts, their functionality, and knowing when and how to replace them is essential. Cheaper, lesser-known brands often lack a diverse range of replacement parts, making it challenging to find suitable replacements. In contrast, reputable manufacturers provide a wide selection of replacement parts, enabling users to prolong the life of their grill.

The key to successful gas grill repair lies in knowing the precise components to purchase. Opting for manufacturer-specific parts designed explicitly for your grill guarantees optimal performance. While generic, off-brand parts may work, they might not deliver the same level of reliability. Presented below is a list of the gas grill components that commonly require replacement.

Ignition

Components Igniters, small in size, are crucial for simplifying the ignition process of a gas grill. Positioned near the burner tubes, these components employ electricity to generate a spark, effectively igniting the propane or natural gas emanating from the burner tubes. In the past, older gas grills lacked igniters, necessitating manual ignition using a lighter wand or a long match by reaching inside the grill.

The primary cause of igniter malfunction often traces back to corroded wire connections. Igniters tend to be the initial components to deteriorate in a gas grill. The typical repair procedure involves replacing the igniter module or electrode units. It’s important to note that igniter parts are typically specific to a particular brand and grill type.”

Gas Burner

Tubes Gas burner tubes are elongated metal cylinders punctuated by rows of small perforations along their length. In a functioning gas grill, gas is conveyed through these tubes and emitted through the holes, combusting to generate the necessary heat for cooking the food placed above. The most prevalent issue affecting burner tubes is corrosion.

The slender metal walls of the tubes are susceptible to rusting. Over time, corrosion can lead to the formation of sizable rust holes in the tubes, causing uneven gas flow—excessive in some areas and inadequate in others. Timely replacement of corroded tubes is vital to maintain optimal performance. This involves the removal of deteriorated tubes and the installation of new ones, securely connected to the gas supply manifold. Replacement burner tubes are designed to be compatible with specific grill models while also accommodating a broad range of different grill models.

Gas Grill Manifold

A gas grill manifold comprises a metal pipe assembly responsible for linking the gas supply to the burner tubes. Typically situated at the front of the gas grill, beneath the burner control knobs and a protective cover, manifolds are susceptible to corrosion, a common issue faced by various metal components of gas grills. Corrosion obstructs the proper transportation of gas to the burner tubes, posing potential safety risks.

The replacement of a manifold entails a series of steps: firstly, removing the control knobs and protective cover, followed by disconnecting the old manifold from the burner tubes and gas line. Subsequently, inserting the new manifold into place and reestablishing the necessary connections, and finally, reassembling the components to ensure proper functioning.

Gas Regulator

Gas regulators are instrumental in linking propane tanks to grills, effectively reducing the gas pressure before it reaches the burner tubes. A malfunctioning regulator can potentially cause gas leakage into the environment prior to reaching the grill. In some instances, regulators may fail to allow gas flow altogether. In either scenario, acquiring a new regulator is essential, involving the disconnection of the old regulator from both the propane tank and the gas line of the grill.

The replacement process consists of threading the new regulator securely, followed by a comprehensive leak test. To conduct this test, a water and dish soap mixture is sprayed onto all connections. If a leak is present, the soapy solution will exhibit continuous bubbling.

October 10, 2023 0 comment
0 FacebookTwitterPinterestEmail
Utility Trailers

Trailer Dolly: Enhancing Trailer Maneuverability

by auto_motivex October 9, 2023
written by auto_motivex

A trailer dolly, also known as a trailer mover or trailer jack, is a device used to move trailers easily and efficiently. It’s typically used for small to medium-sized trailers that need to be maneuvered in tight spaces or positioned accurately.

A trailer dolly usually consists of a sturdy frame with wheels, a hitch or coupling mechanism to attach to the trailer, and a handle for manual control. The wheels can vary in size and design, offering different levels of mobility and stability based on the terrain and trailer weight.

The purpose of a trailer dolly is to assist in moving trailers without the need for a vehicle to tow them. This can be useful for parking trailers in confined areas, aligning them for hitching to a vehicle, or making minor adjustments during loading or unloading.

There are also motorized or powered trailer dollies available, equipped with an electric motor or other power sources to further ease the task of moving heavy trailers. These motorized versions provide enhanced control and can handle larger trailers or heavier loads.

Overall, a trailer dolly is a valuable tool for individuals or businesses involved in transporting trailers, making trailer handling more convenient and efficient.

Enhancing trailer maneuverability is a key objective in the realm of trailer handling and transportation. This involves employing various strategies and tools to optimize the movement and control of trailers, ultimately improving safety, efficiency, and ease of use.

One effective approach to enhance maneuverability is through the use of trailer dollies. These specialized devices provide additional control and precision when positioning or relocating a trailer. By attaching a dolly to the trailer’s hitch, individuals can easily move it by hand, allowing for smoother navigation in tight spaces or challenging terrains.

Moreover, advancements in technology have led to the development of motorized trailer dollies. These electric or powered devices further enhance maneuverability, particularly for heavier trailers. They offer increased pulling capacity and can handle inclines or slopes, providing a more versatile solution for moving trailers effortlessly.

In summary, enhancing trailer maneuverability is a critical aspect of efficient trailer management, and the utilization of trailer dollies, especially motorized variants, significantly contributes to achieving this objective.

Here are common situations when a tow truck dolly is generally used:

  1. Disabled or Inoperable Vehicles: Tow dollies are commonly used for vehicles that are disabled, inoperable, or have a flat tire. The dolly allows the tow truck to lift the front or rear wheels off the ground while towing the vehicle.
  2. Repossessions: Tow dollies are often used for repossessing vehicles. When repossessing a vehicle, a tow dolly can be employed to lift and tow the vehicle without needing to start or operate it.
  3. Uneven or Limited Space: In situations where the vehicle cannot be easily loaded onto a flatbed tow truck due to limited space or an uneven surface, a tow dolly provides a practical solution. It allows for easy towing in tight or challenging spaces.
  4. Towing Front-Wheel Drive Vehicles: Tow dollies are commonly used for front-wheel drive vehicles. The dolly lifts the front wheels off the ground, allowing the rear wheels to roll freely while being towed.
  5. Towing Multiple Vehicles: When a tow truck needs to tow more than one vehicle simultaneously, tow dollies can be used to tow an additional vehicle behind the tow truck, especially when towing a vehicle with a flatbed.
  6. Short-Distance Towing: Tow dollies are suitable for short-distance towing needs, especially when the destination is nearby and the vehicle’s rear wheels can remain on the ground.
  7. Lighter Vehicles: Tow dollies are often used for lighter vehicles such as sedans, compact cars, or smaller SUVs. The dolly can safely tow these vehicles without the need for a flatbed tow truck.
October 9, 2023 0 comment
0 FacebookTwitterPinterestEmail
Newer Posts
Older Posts

Recent Posts

  • Effective Cleaning Methods for Tonneau Covers
  • Approaches to Retain the Enchanting New – Car Fragrance
  • Optimal Car Trash Can Choices
  • Optimal Strategies for Cleaning and Maintaining Truck Running Boards
  • 环保型机油处理与回收

Recent Comments

  • Korey on What is the Recommended Frequency for Motorcycle Oil Changes?
  • Greg on What is the Recommended Frequency for Motorcycle Oil Changes?
  • Reye on Transporting Cargo with Pickup Trucks
  • mark on How to Properly Hook Up a Trailer?
  • marcus on What is the Recommended Frequency for Motorcycle Oil Changes?
  • Facebook
  • Twitter

@2020 - All Right Reserved. Designed and Developed by Auto-Motivex


Back To Top
Auto Motivex
  • Detailing
  • Motorcycle
  • Parts
  • Truck
  • Utility Trailers
  • Blog